Discussion Board is a question type built for Instructor Paced live sessions. You post an open prompt, students share their thoughts, and every response lands on a shared board where classmates can like and comment on each other's ideas.
You stay in charge of the conversation the whole time. Review posts and comments before they appear, switch comments on or off, and allow students to post more than once. These controls can be adjusted at any point during the session.
Available on the Wayground Individual, School, and District Plans.
In this article, we will go over the steps you can follow to create a Discussion Board question, manage the conversation during a live session, and see what the experience looks like for your students.
How to add a Discussion Board question
A Discussion Board question works best as a warm-up, a check for understanding, or a closing reflection. Here are the steps to add one:
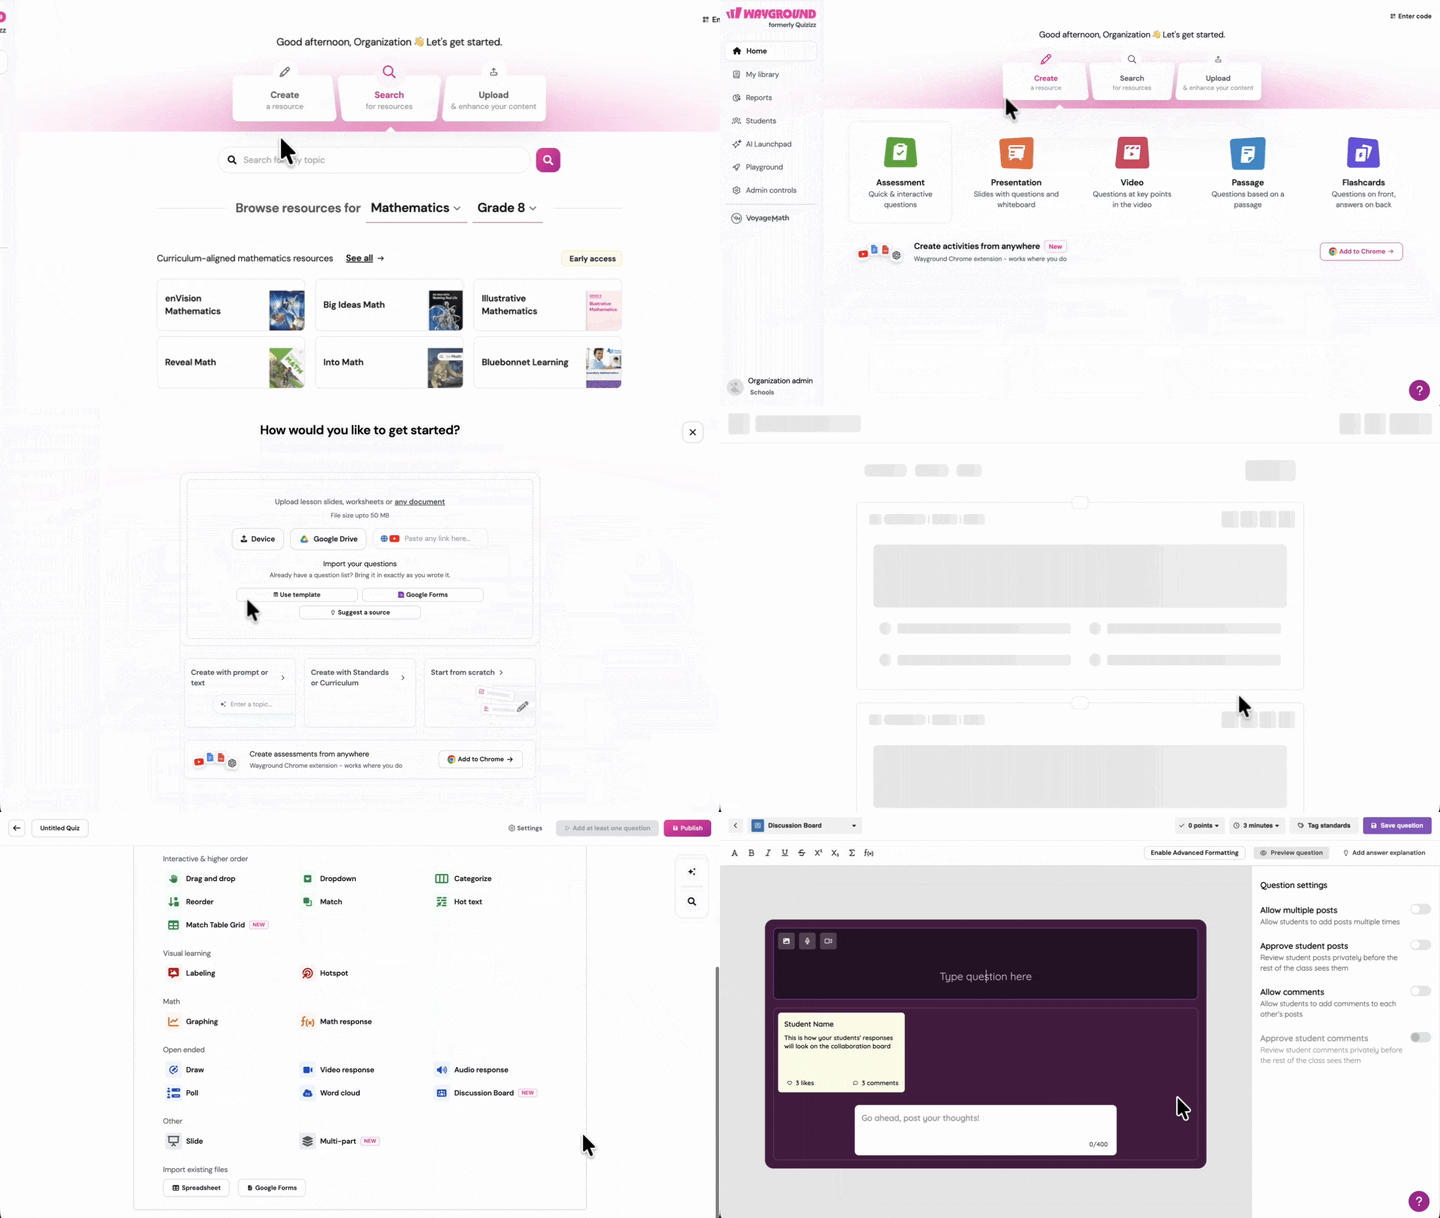
Go to your Wayground home page.
Click on 'Assessment'.
Select 'Start from Scratch'.
Choose 'Discussion Board' from the list of question types.
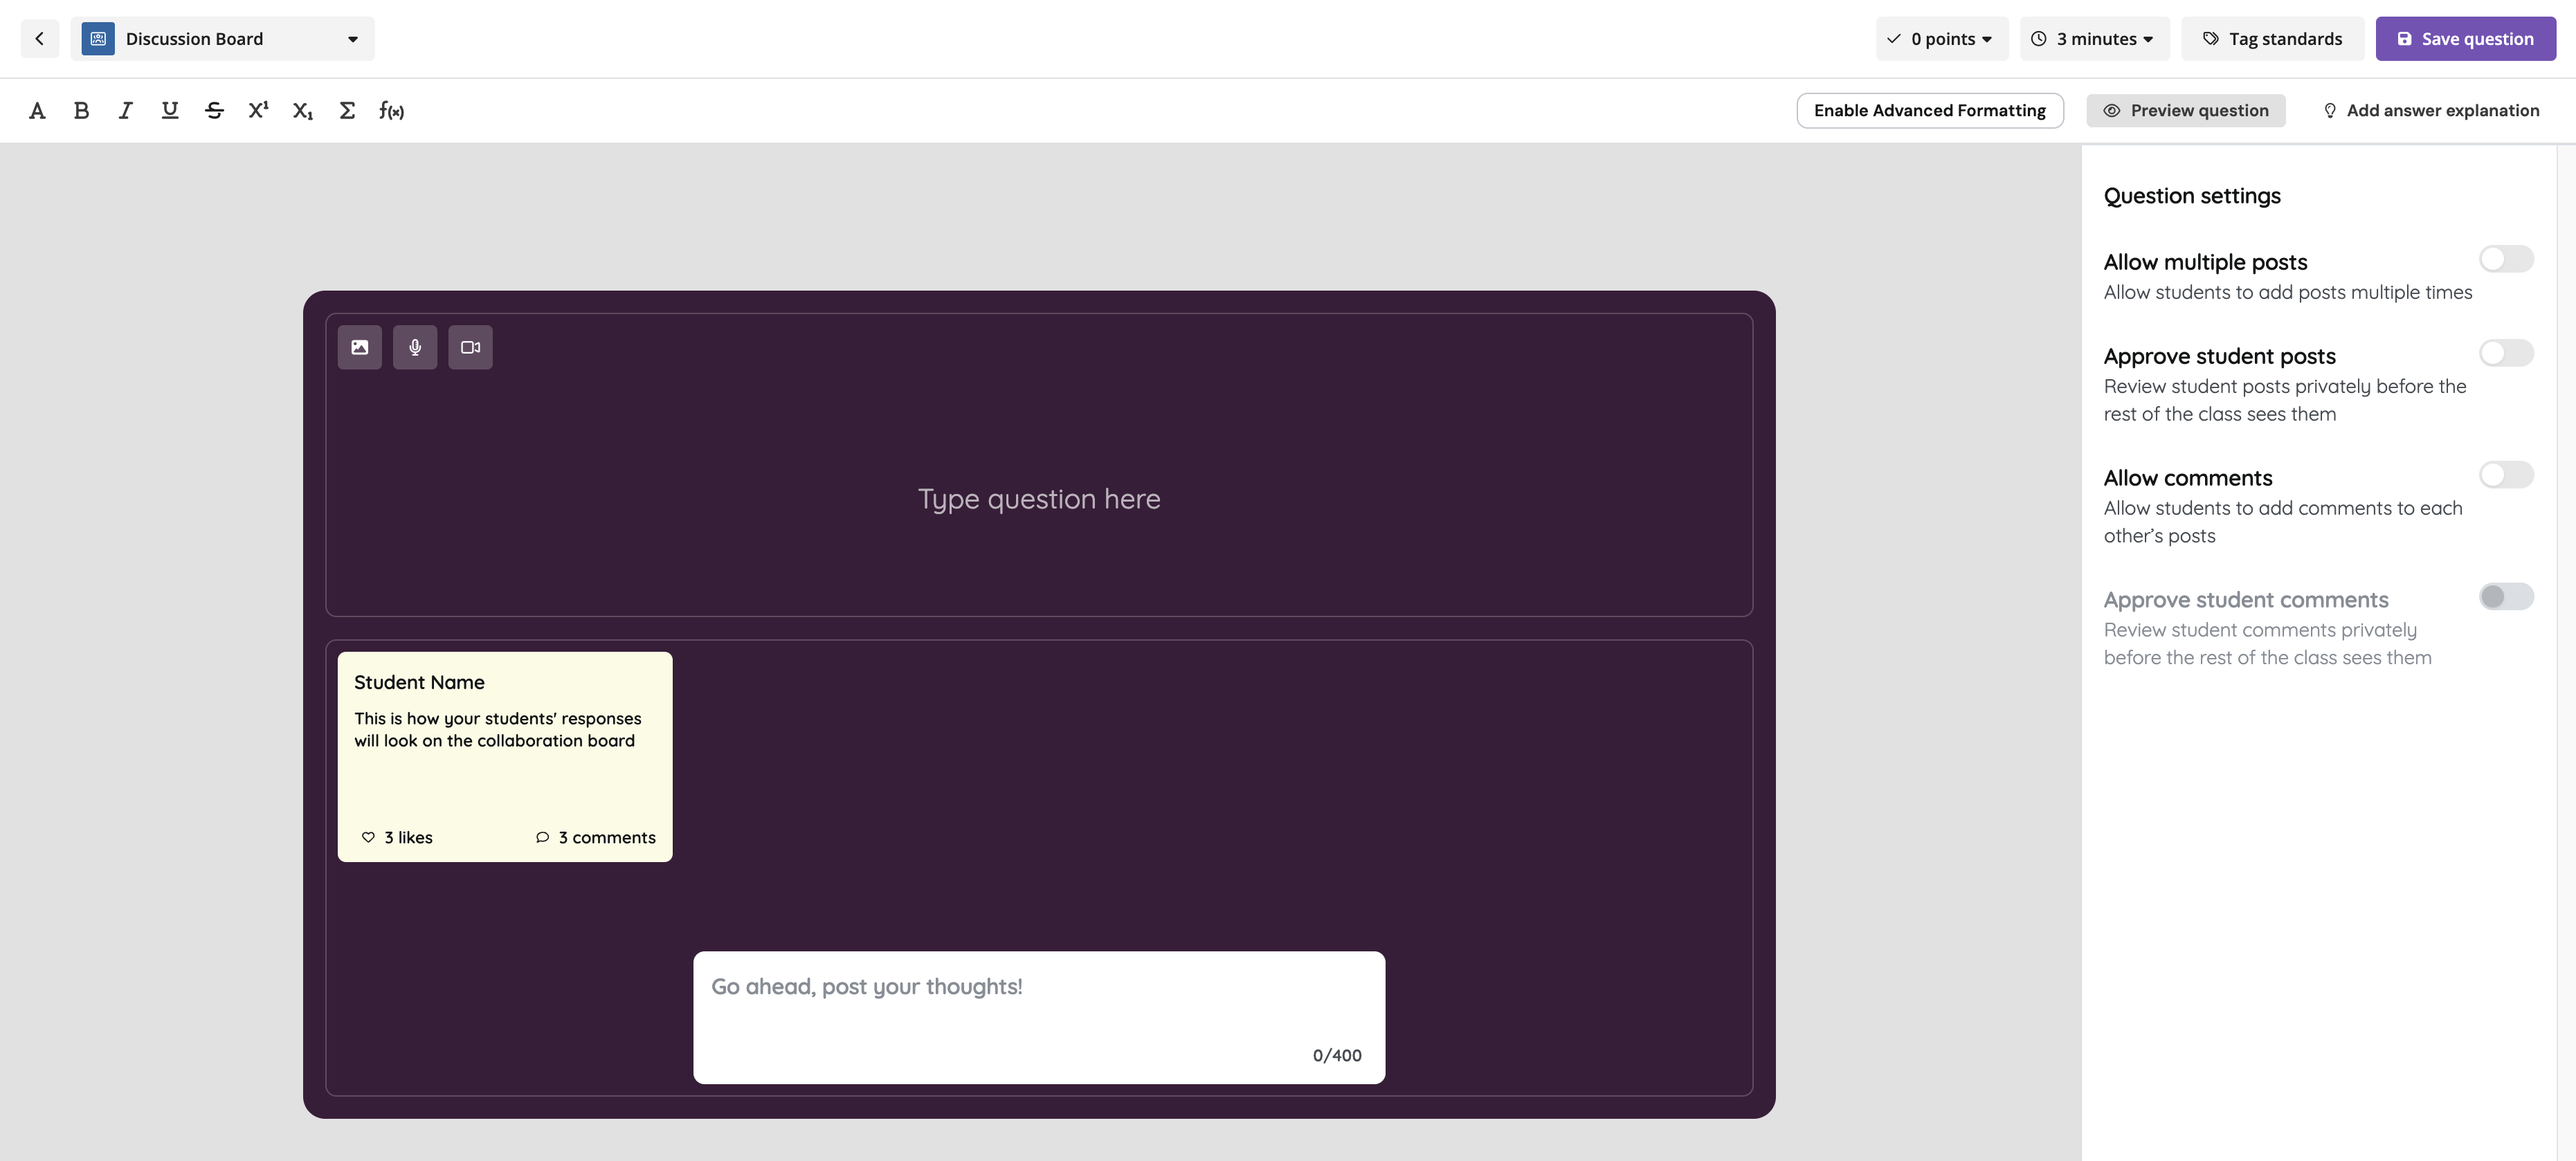
Type your prompt in the question field. Open prompts such as "Where should go for our next field trip and why?" invite longer, more thoughtful responses.
You can choose to toggle any of the following settings based on your preference:
Setting
What it does
Allow multiple responses
Students can post more than once on the board, up to 5 posts each. When off, each student can post once.
Require approval for posts
Student posts wait for your approval before they appear on the board. When off, posts appear immediately.
Allow comments
Students can comment on their classmates' posts. When off, students can only like posts.
Require approval for comments
Student comments wait for your approval before they appear on the board. Applies only when comments are allowed.
Click on 'Save question' to add the question to your Assessment.
Note: Discussion Board runs in Instructor Paced live sessions, so host your Assessment in that mode when you are ready for the class conversation.
How to manage the discussion board during a live session
Once the question is live, your dashboard becomes the moderation hub. Posts and comments appear as cards on the board, and anything waiting on you is tagged 'Pending approval'. To run the discussion, follow these steps:
Click on the 'Responses' tab at the top of your screen to open the shared board. Share the join code with your class so students can enter the session.
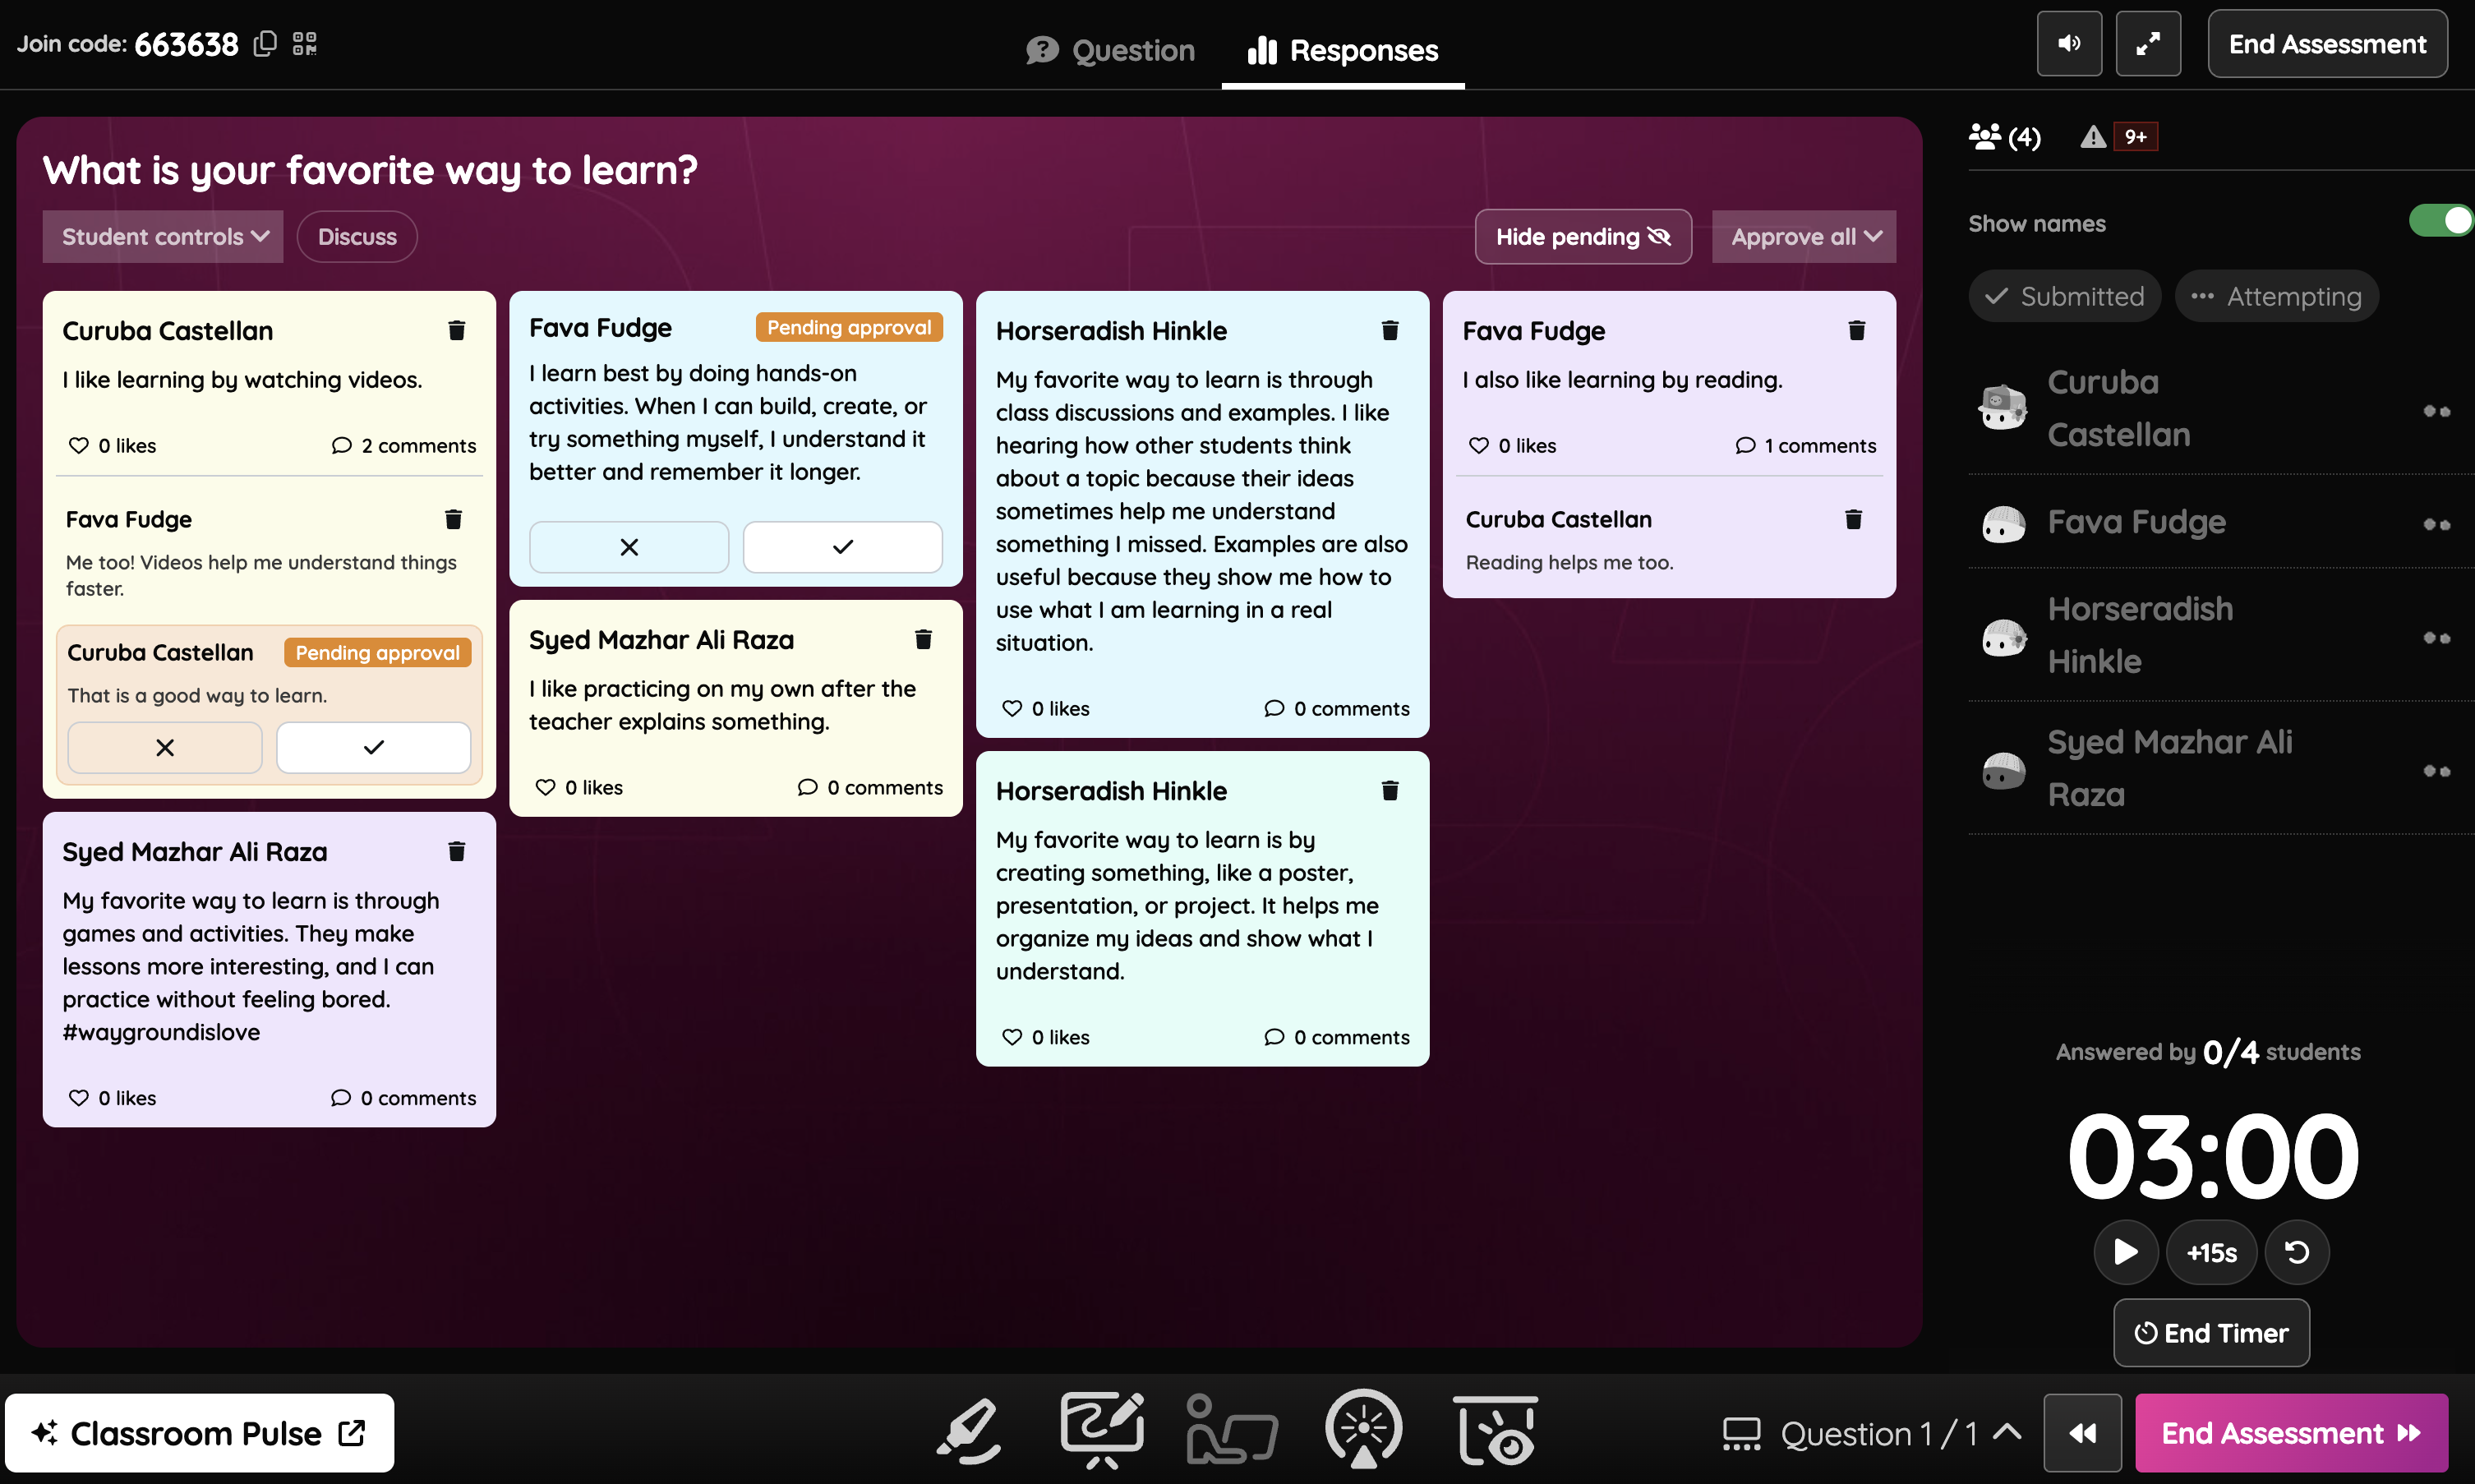
Click on 'Student controls' to set how the conversation runs. From here you can review posts and comments before they go live, turn comments on or off, and allow students to post more than once. You can change these settings at any point during the session.
Review each card marked 'Pending approval'. Click on the check mark to publish the post or comment to the board, or click on the cross to reject it.
To move faster, click on 'Approve all' and publish everything waiting in the queue at once.
Click on 'Hide pending' if you want a cleaner view of the board that shows only the approved responses.
Use the 'Show names' toggle on the right panel to display or hide student names, and switch between 'Submitted' and 'Attempting' to see who has posted and who is still typing.
Use the timer controls to start, extend, or reset the time students have on the board. Click on 'End Timer' when you are ready to wrap up.
Click on 'Discuss' to bring the class together around the posted ideas, then click on 'End Assessment' when the conversation is finished.
Pro Tip: Project the board on your main display so the whole class can read responses as they come in. It makes the discussion feel like a group conversation instead of a solo task.
What students see on the discussion board
On their own device, students see the prompt at the top and the shared board below it. Here is how they take part:
Students type their response in the 'Go ahead, post your thoughts!' box at the bottom of the screen. Each post allows up to 400 characters.
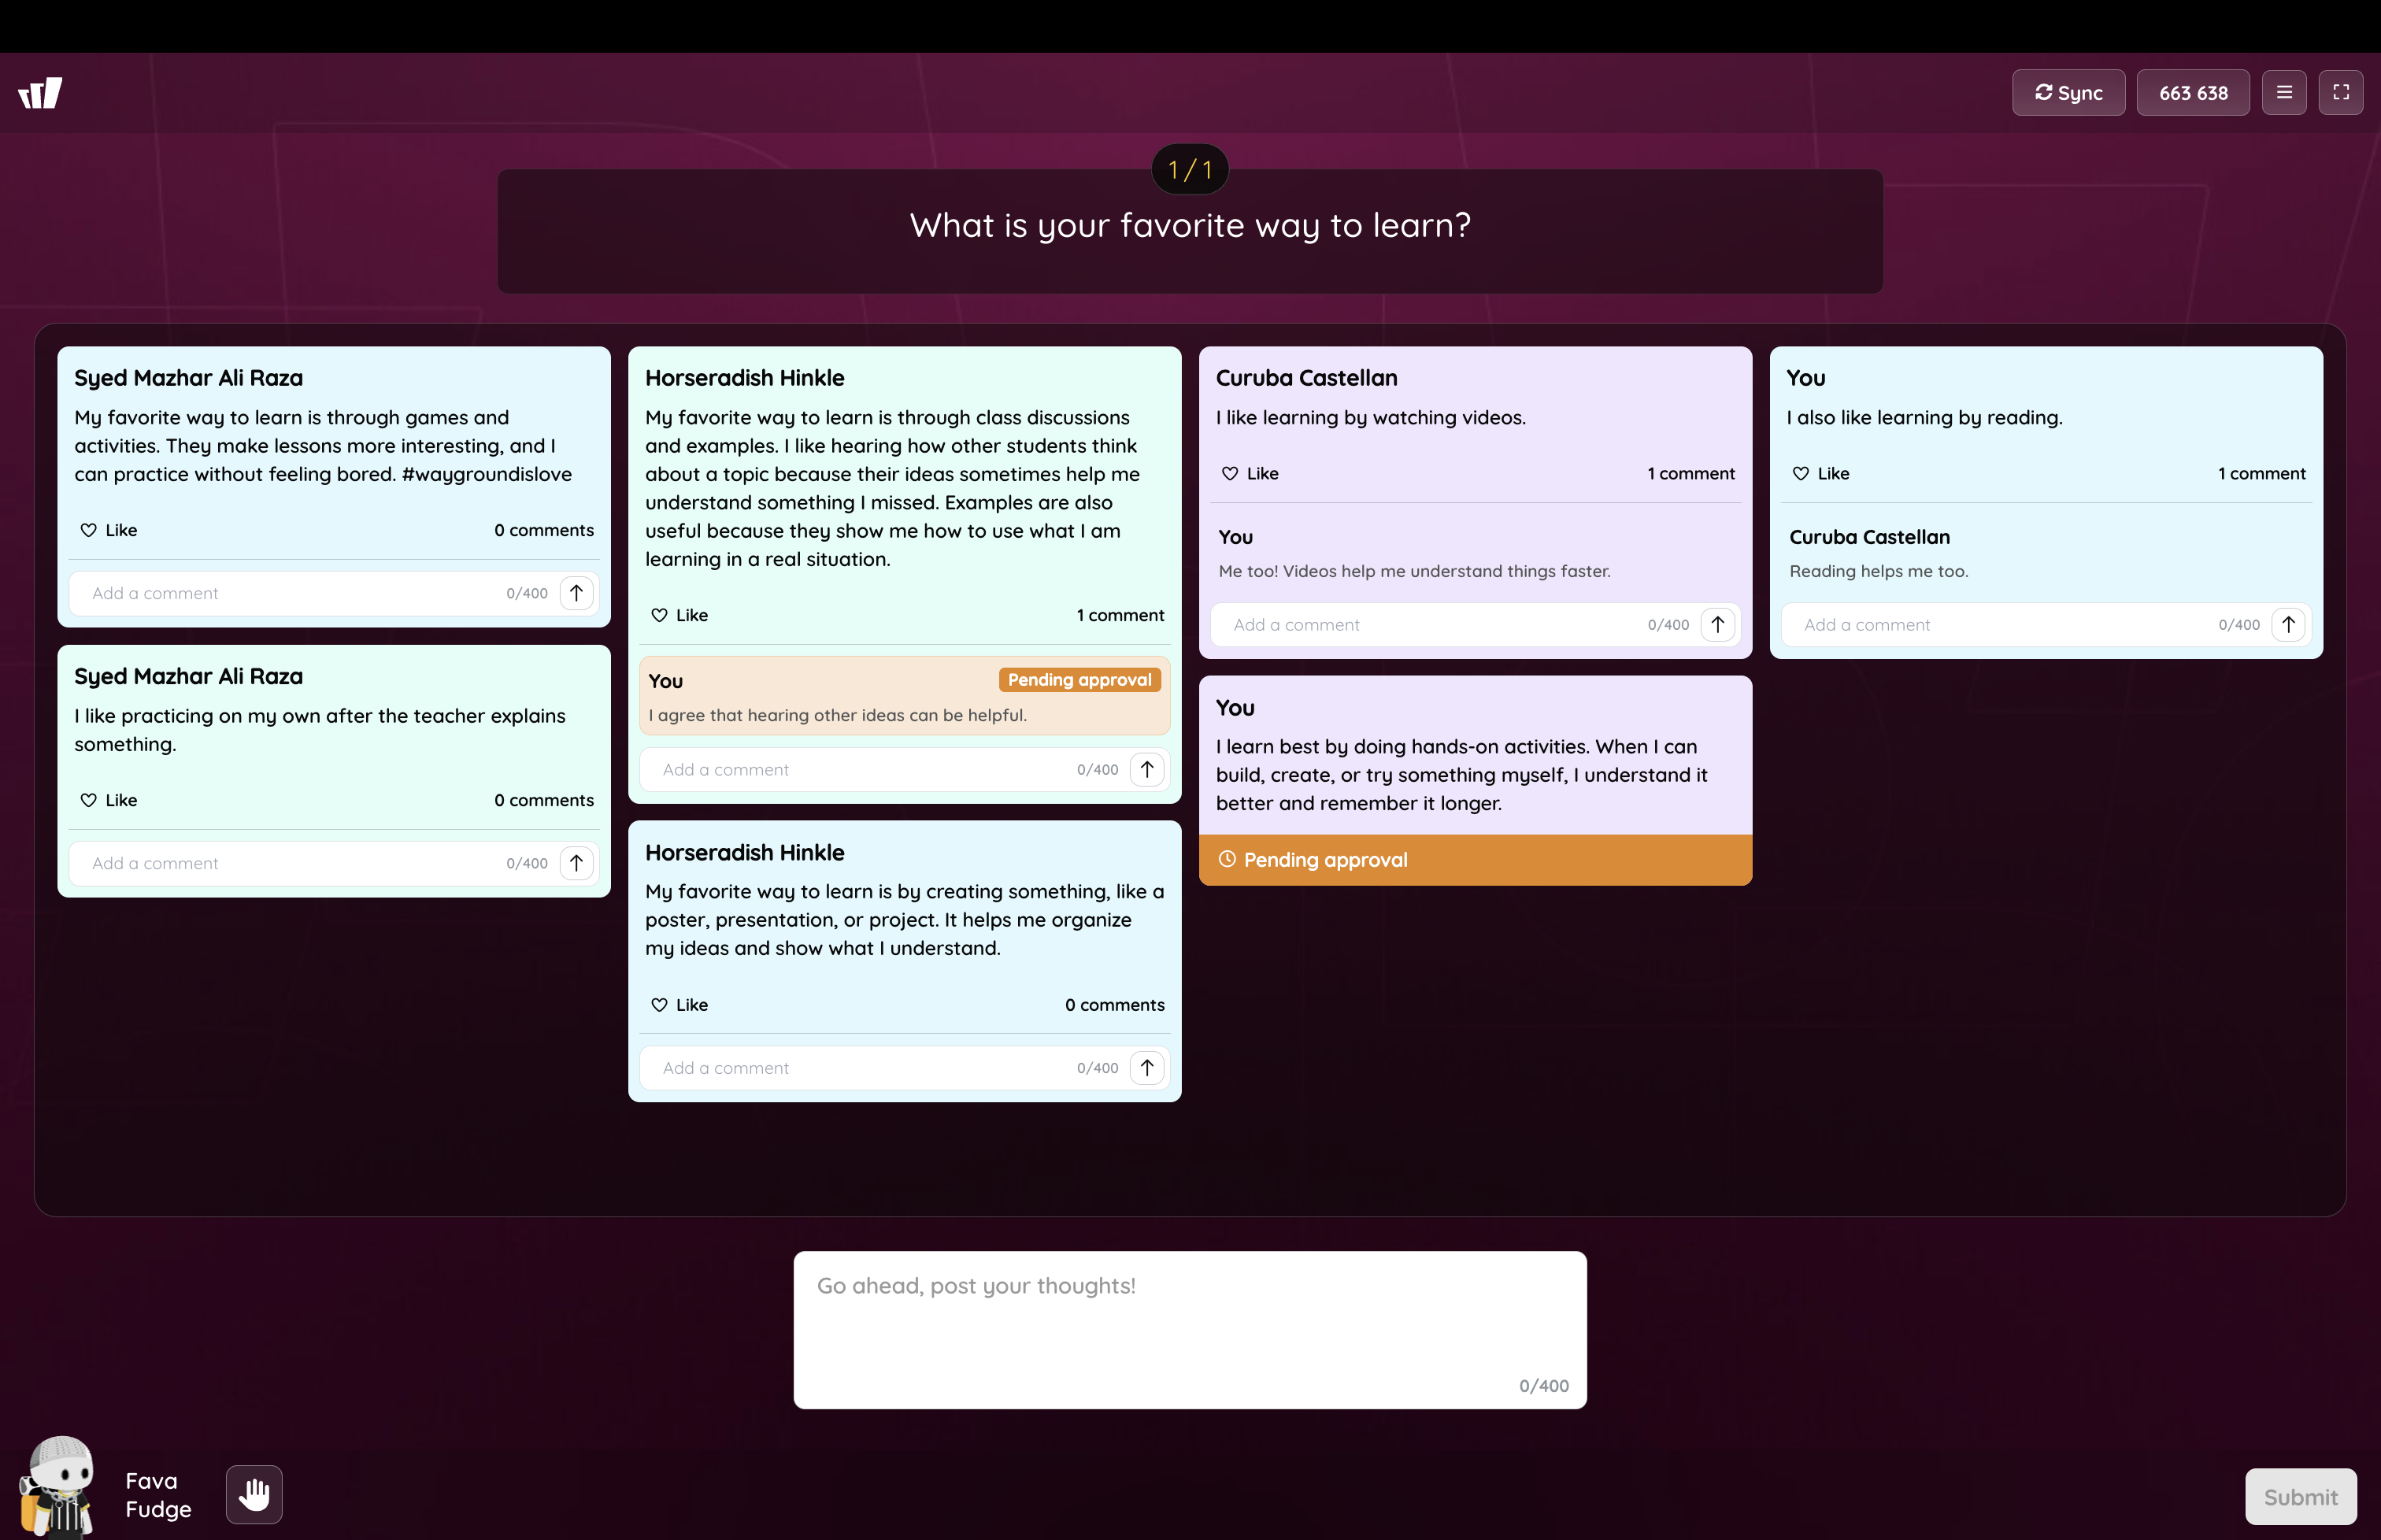
They click on 'Submit' to send the post to the board. Their own response is labeled 'You' so it is easy to spot.
If you have turned on review, the post shows a 'Pending approval' tag until you approve it.
Students react to classmates by clicking on 'Like', or they reply using the 'Add a comment' field on any card when comments are enabled.
They can click on 'Sync' at the top of the screen to refresh the board and pull in the newest responses.
Note: If you allow multiple posts, students can keep adding ideas as the discussion grows. Turning comments off is a quick way to refocus the class on original posts.
That is it. Your Discussion Board question is ready to turn a simple prompt into a class-wide conversation, with every voice on the board and you steering the discussion.
Was this article helpful?
That’s Great!
Thank you for your feedback
Sorry! We couldn't be helpful
Thank you for your feedback
Feedback sent
We appreciate your effort and will try to fix the article